If there was one problem with the summer of 2003
it was that even though PotC was a Disney film,
they eschewed their popular marketing blitz that usually
accompanies a blockbuster release. Either mousey
executives were too cautious or too afraid that their
efforts would be wasted. Little did they know that they
would be stoking the fires of public interest in ALL
things piratical, and pirate fans would be clamoring for
merchandise. Of course, other companies were ready to
step into the void, and we were treated to games like
WizKids’ Pirates, however, it would be three long years
before real PotC gaming merchandise would
appear. The first salvo comes from our fabulous friends
at Upper Deck, and it’s actually titled “Pirates of the
Caribbean: Quickstrike Trading Card Game” and the first
set is called “Dead Man’s Chest” coinciding with the
first of two sequels.
Quickstrike is a new game engine from Upper
Deck; it’s based somewhat on their Shaman King
trading card game, but with some new mechanics. The
most revolutionary of which is the “Chamber Card”
(borrowed directly from the previous game), which
represents the character you’ve chosen to play with.
Each starter comes with two chambers and two 30 card
playable decks. These decks are 100% random; you might
get a super-rare Gold Doubloon card in your starter.
Those two decks won’t be enough to make your own
competitive tournament deck though, for that you’ll need
to purchase or trade for a lot more cards, but let’s not
get ahead of ourselves. Let’s check out the contents of
that starter box, shall we?
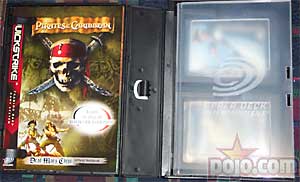
- What’s In your Udeck Box? -
The case is actually the same size as a DVD
case, and like a DVD case you can change out the
slipcovers. There are five additional covers available
on Upper Deck’s official site for you to download and
print, but I’ll be willing to be that there are fan
customs being done already. In fact, that gives me an
idea for a contest – but you’ll have to check the PotC
forums because I’m not going to reveal it here.
The rules and your play-mats are housed in the left hand
side, and your cards are held in a very durable card
tray on the right which has it’s own snap-style lid. In
each starter you get one rulebook and two of the same
play-mats. From what I understand there are also cloth
backed playmates available from Upper Deck as promos.
One side of your play mat also has a sample game between
Will Turner and Davy Jones (which coincidentally was the
first game I actually played, since those are the
Chamber Cards I got in my first starter. Remember,
starters are 100% random, though you’re guaranteed to
get two chambers, and at least two rares.)
The design of this box is
 fantastic, each box will hold
at least a 60 card constructed deck, even if the cards
are in sleeves, and these babies are 100% customizable.
By the way, Udeck boxes are coming soon for pretty much
every UDE game, except for Yugioh! Yes, Versus is
getting them, supposedly.
fantastic, each box will hold
at least a 60 card constructed deck, even if the cards
are in sleeves, and these babies are 100% customizable.
By the way, Udeck boxes are coming soon for pretty much
every UDE game, except for Yugioh! Yes, Versus is
getting them, supposedly.
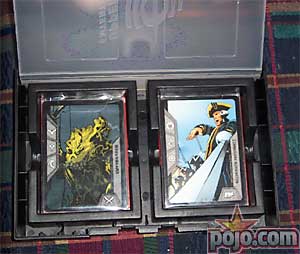
With your first starter set you’re going to
want to keep the two decks separate. Open up one of the
wrappers and check out the Chamber Card, that’s
the triple thick/double-sided card right on top. You’ll
notice there’s a rectangular shaped tab with rounded
corners on the top, if you grasp this tab and pull up
gently, you’ll find that Chamber Cards’ hidden
signature move. Each side of the card has a different
signature move, the first, on the side with the traits
that character can use on the left side of the card, is
stronger than most other strike cards in the game, but
weaker than the signature move on the back. We’ll get
back to signature moves later, so just slide that
signature move right back in the card. You won’t be
doing any damage to the card itself by sliding the
signature move in and out; these cards are designed to
take some pretty heavy use. One of the first
Chambers I got was a Lord Beckett, and the
signature move didn’t really want to come out at all.
My wife grabbed it, pulled and I thought it tore. Turns
out, it’s fine, that card had a little extra “flash” on
the sides that slide, so it wasn’t damaged at all.
Chamber Cards being too thick and also being double
sided will not fit in a standard card sleeve, however
they work just fine in a plain old penny sleeve, so
that’s what I suggest you store your Chamber Cards
in. If you’re trading Chambers, you’ll have to stick
them between two different top-loaders and just tape
that bad-boy in, because they will not fit in most
top-loaders.
Now that you’ve checked out your character
card, check out the rest of your 30-card starter deck.
You’ll notice there are three types of cards; cards with
blue borders are called Strikes. They represent
the main action in the game, having both an Intercept
(your defense) and a Force (your attack)
statistic. They, like every other non-Chamber card in
the game, also have payment costs on the left side of
the card, the numbers in the green, yellow and red
sections represent how many of each energy type you need
to pay to play this card. Finally there is a text box
containing any special abilities the card has, and
flavor text of course. The artwork in this game Is done
entirely by Cold Fuzion Studios, and appears to be drawn
from the upcoming Pirates comic books from Disney (a
taste of which has just been published in the most
recent Disney Comic Adventure Digest magazine, on sale
now). Some of the interpretations are a little off (Jack
Sparrow doesn’t look a thing like Johnny Depp in my
opinion), but the card art is nicely dynamic with a
great mix of character studies and action sequences.
For your first game you’re going to ignore
the icon in the top left corner of your cards, but going
forward, these icons represent the type of Trait
required to play that card. Each Chamber Card
has two different attack traits, one ally
trait and one advantage trait. Only cards
with those icons on them can be placed in a deck
utilizing that Chamber Card. Sounds complicated,
but it really isn’t, just remember, if a card has a
trait that isn’t listed on your chamber card, it can’t
go in your deck. For your first few games though,
you’re going to want to ignore those trait markers, just
to get a feel for the mechanics.
As you look at your strike cards, take special notice of
your Intercept number, that’s your defense, when
you’re being attacked you’ll have to have your
Intercept be equal to or greater than the value of
your opponent’s Force. Strike cards are the only
cards than have these two values printed on them.
Pink colored cards represent your Allies;
these are cards representing your friends who assist you
in battle. These cards also have a payment cost printed
down the left side, and you can only have one ally
deployed into each of your play zones, for a maximum of
three at any given time. You can play multiple copies
of the same ally in each zone if you desire. Allies
can be very important in this game, not only for their
own intrinsic game effects, but also for the effects
from other cards which utilize your in play allies,
however, due to the fact that you can only have a
maximum of three in play at any given time, it’s not
wise to overload your deck with allies. Finding the
right balance it completely up to you. Some allies have
the keyword “Deploy” which usually involves an
additional payment cost of some kind. If you use this
keyword you can move that ally to an empty space, an
action that is normally not allowed.
Advantage cards are exactly what they
sound like. Gold colored borders give you a temporary
game advantage, and also charge the zone in which
you play them. We’ll look more at charging your zones
in a few minutes. Each Advantage has a payment
cost just like strikes and allies. Some advantage cards
have an additional keyword “Immediate”, if this
is the case, then the card effect happens immediately,
you charge your zone, and then you discard the card.
All other Advantages are played into your
advantage zone and stay there until your next
“clean-up” phase.
- Playing the Game -
As with most CCGs Quickstrike relies
on a payment system to balance game play. Unlike most
CCGs, Quickstrike has no hand. To start a game,
lay out your play mat next to your opponents. You’ll
notice you have three zones, a green zone, a yellow zone
and a red zone. These zones represent your power
level. A game represents a duel between two characters,
your health, represented by your energy levels, will ebb
and flow during game play, and running out of energy is
not a game losing condition. Instead Energy is
replenished at the beginning of almost every turn.
To start the game you shuffle your deck and
deal out three cards face down in each of your three
zones. This represents your starting energy. Next,
turn up the first four cards of your deck in your
discard pile. Count the number of Force
available on those cards and compare to the same number
of cards from your opponent. Whoever has the most force
CHOOSES who gets the first attack. It may not always be
in your best interest to attack first, especially if you
need energy, however in most of the time it will be.
Each player’s turn is broken down into four
phases. The first is clean up, which you don’t do on
the first turn. Every subsequent turn during your
clean-up phase, you discard the strikes you’ve
counterattacked with previously, and all advantages from
your advantage zone. You do not discard Allies.
Phase two is the replenish phase, during
which you get one additional energy from your discard
pile to your energy zones, based on which zone your
attacker stopped your attack from and counterattacked.
(More on this a little later).
Phase three is where you check to see if you
can play your signature move. If you can (you have all
three zones charged), then you follow the instructions
on how to play a signature move (listed below), instead
of flipping from your deck.
The last phase is the flip phase. If you
cannot play a signature move, then you attempt to defend
yourself against your opponent’s attack by flipping the
top card of your deck into your green “Flip Here”
section.
- Opening Attack & Defense -
The opening attack is always a strike with a
Force of 4. To make the first attack you merely
declare the opening attack with “Force 4”. It is
now your opponent’s turn. They begin their first turn
by adding a green energy by taking their top card from
their discard pile and turning it face down in their
green energy zone. They now have four green energy,
three yellow energy and three red energy. The object is
to stop the attack with a suitable strike card with an
Intercept value equal or greater to the Force
value. For the first turn, that number is four, so they
have to find a strike from their own deck with an
intercept of four or greater. How do they do that?
They flip the top card of their deck into their green
“flip here” area. If the card they flip is a Strike
with an Intercept value of 4 or better, they have
successfully defended the strike, and can now
counterattack after paying the payment cost. If you do
not flip a strike over, but you flip an Ally
over, you can still play the ally card, as long as you
can meet the payment cost. If you do decide to play the
ally card, pay the payment cost and put it in the ally
zone of the section you are defending, follow the card’s
ability, and continue defending that zone. Same for the
Advantage cards, if you wish to pay the
advantage, pay the payment cost and move the advantage
to your advantage zone, follow any card ability and
continue to defend the zone.
If you cannot meet the payment cost for any
card, or do not wish to play that card, you can “Focus”
the card by immediately placing the card face down in
your energy zone (thus the card becomes an additional
energy). You have not successfully defended that zone,
and you are now defending the zone one level down. If
you cannot defend from your green zone, you move to your
yellow. If you cannot defend from your yellow zone you
move to your red. If you cannot defend from your red
zone, then your opponent immediately earns a point, gets
to celebrate and we move back to the opening attack,
however, if you lose a point you don’t get to add any
energy. You do get to choose who has the next opening
attack though. The game ends when one player has scored
three points.
- Subsequent Attacks -
Once you have successfully defended your
opponent’s attack, you can counterattack, by turning
your strike card sideways and declaring a
counterattack. You are now counterattacking from the
zone you were defending with a Force that is
printed on the card. It is important to note that many
allies and advantage cards, as well as the strike cards
themselves have modifiers to your force and interrupt
values, so keep track of every modifier on the board.
Forgetting to add your modifiers can really cause you to
lose the game if you’re not careful.
After you counterattack your opponent gets
to clean up and replenish. Clean up involves placing
your last strike card in your discard pile and
discarding all advantages from your advantage zone.
Note – ALLIES ARE NEVER DISCARDED DURING THE CLEAN UP
PHASE. To replenish, you add a single energy for each
zone that you defended. If you defended from your green
zone, they get one green energy. If they defended from
the yellow zone, they get one green and one yellow. If
you defend from your red zone, they get one green, one
yellow and one red. If they score a point, they don’t
get to add any energy at that point, until they
“celebrate”.
- Signature Moves -
If all three of your zones are charged, at this point
you can play your current signature move after your
cleanup and replenish phase by immediately uncharging
all your zones and pulling out the hidden signature move
from your Chamber Card. This strike and
counterattack is considered not to be defending any
specific zone. Once you play your signature move
(paying any payment costs if necessary), you treat the
signature move like any other strike card. Because you
did not play a strike from a specific zone, your
opponent does not get to replenish after this attack.
Once your signature move has been played and you have
either scored a point, or your opponent has successfully
defended and is counterattacking, you close your chamber
and flip the card over. When all three of your zones
are successfully charged again, you can use your other
signature move. If you use both signature moves, you
flip the card over again and start with your first one.
-
Celebration Time Come Home –
Celebrations take place after you score a
point, and all it really means is that you get to add an
energy to each zone where you have an ally card. There
are a few cards that have specific celebration effects,
such as adding an extra energy or not being able to add
an energy. The person who got the point score against
them gets to choose who gets the next opening attack,
and the process starts over again, though again, you do
not remove your Ally cards during the mutual clean-up
phase that follows a celebration. The player
celebrating also does not remove Advantage cards during
this mutual clean-up phase.
- Tips and Tricks -
That’s a quick overview on how to play the
game. As you collect more cards you can form a 60 card
constructed deck by only placing strikes, ally and
advantage cards that have the same traits as your
Chamber Card. There are 10 different characters
represented by chambers, and each character has five
different strike combinations (with one reprinted).
Allowed traits do not change between chambers, so any
Will Turner chamber will have the same traits as any
other Will Turner chamber, even though the signature
moves may be completely different.
Finding the right balance between Strikes, Allies and
Advantages in your deck is the key strategy in this
game, since you have no hand, all your skill is going to
be used in creating your deck. Even with over 250
cards, I can barely put together a decent deck for each
of the different characters that I’ve acquired. I have
8 different characters currently and 17 different
Chamber Cards. So far I’m only missing Barbossa and
Jack Sparrow. The difficulty in putting together decks
is that within each allowable trait there’s only a
limited amount of cards you can use, with the rare cards
being the better cards. Each strike trait has 20
different cards, with an additional 20 generic strikes.
Each ally trait has 10 different cards with an
additional 10 generic allies, likewise for the
Advantages. Being that Quickstrike is a shared game
system, cards from the previous Quickstrike game,
Avatar the Last Airbender are fully playable, as
long as they have the same trait, so if you’re
interested in additional cards, you may wish to check
out that game as well, because assuredly competitive
tournament decks will include cards from both games.
Unique to each set though is a series of
strikes adhering to the theme of that set. For PotC
those are strikes that are sailing oriented, sailing
combat oriented or sword dueling oriented. There are an
addition 10 strikes available in each of these three
traits. Finally each set has a small series of foil
special cards. In PotC these are beautiful
gold-doubloon advantage cards. These doubloons can only
be used with the specific character on the front of the
card. There is one for each character.
Once you have your decks created, game play
is quick and breezy. The unique nature of the energy
system gives the game the feeling of an epic battle
between titans, and just when you think you might be
done for, you pull a fantastic strike that wins you the
game. The first couple of points scored though, seem to
take the longest time. Points are usually score when
you can no longer pay the payment cost of the card
you’ve flipped. Very rarely do you flip a strike that
you can’t defend with, more often you can’t actually
play the strike because you don’t have enough energy.
Beware of those cards that require a red
energy. These are the hardest to replenish, and are the
most valuable, since you can use them to pay for any
energy cost. If you have, say 3 Green and 1 Red energy
left, and you flip a card requiring 2 Green and 1
Yellow, you can pay the yellow cost with a red energy.
Red can pay for green or yellow, and Yellow can pay for
Green. Also pay close attention to the both the force
and the intercept value of the card. A strike with an 8
Intercept and 2 force may seem like a great card, but it
really isn’t. Sure you can stop your opponent’s attack,
but your counterattack will most likely be defended in
your opponent’s green zone, giving you only one green
energy when you defend.
Too many allies can result in you paying
energy costs for assistance that you may not need, and
spending too much energy deploying (moving certain cards
with that keyword to empty ally spaces), and you’ll be
left with no energy to actually pay for your strikes.
Too many advantage cards can actually hinder your deck
as well, if you can’t get the advantage to come out in
the right zone. Playing an advantage in an already
charged zone is pretty much a waste of time and energy.
I have yet to see a signature move that was
truly game breaking anyway, so while it’s really cool to
play signature moves, they most often won’t be winning
any points for you.
- Collecting -
So far
there is no secondary market to speak of for this game.
Since the game is so new, there are very few auctions on
EBay for anything other than sealed packs, boxes or
starters. However, given the popularity of the license,
and the beauty of the cards, plus the ease of adoption,
I can see this game taking off over the next couple
months. Doubloon cards are seeded at a ratio of 1 in 6,
though two starters and 13 packs I’ve already pulled
five of them (two are doubles though). I would imagine
that the initial cost on these would be about $10 each,
though depending on the character that could be lower or
higher. The Davy Jones doubloon card is
particularly worth playing, and should be at the top end
of the spectrum on pricing. The Pintel and Ragetti
card, however, is actually pretty crappy, and since they
are not as popular as the other characters, won’t be
seeing much action on the secondary market.
Chambers come one in a pack, and only the rare chambers
will garner any additional value. The inclusion of
Jack Sparrow, Will Turner or Elizabeth Swann
on cards will definitely add some value though. Each
of the main characters also has a rare Ally card
with fairly good abilities. These will probably go in
the $5-10 range. Most rares should sell for $5 or
under, with uncommons maxing out at $1-2. Investment
wise, a purchase of two-three boxes should provide you a
complete set, though sets by themselves will not be play
worthy at all. In order to create a quality tournament
level deck you’ll need full play sets of the best
strikes, and that may set you back some dough, since the
best cards are all rare.
Trading wise, you’re probably best to stick
to card type for card type. If you have a rare doubloon
you should probably hold out for a rare doubloon in
return. Likewise, rare chambers should go for rare
chambers. Though it’s entirely possible to pull a
triple rare pack (rare chamber, rare card and gold
doubloon), it’s probably very difficult to actually get
one. Rare Chambers are definitely fewer and farther
between (I have one so far).
So if you’re looking for something different
this summer, games with built in expansions already,
look no further than Quickstrike.
The set composition is as follows:


 under the radar of
most Americans hit the big screen, and NO ONE knew what to
expect from a pirate movie based on a Disneyland ride, after
all, the most successful “pirate” movie ever was Hook
more than a decade earlier, and it wasn’t even all that
successful. However, what Gladiator did for
gladiator movies, Pirates of the Caribbean: The Curse of
the Black Pearl would do for the classic pirate film.
With the creation of Jack Sparrow, Ted Elliott and Terry
Rossio along with superb acting by Johnny Depp, forged an
icon of popular culture that will undoubtedly surpass the
legendary status of real pirates such as Morgan, Avery and
Teach, and is already more popular than any other pirate in
fiction.
under the radar of
most Americans hit the big screen, and NO ONE knew what to
expect from a pirate movie based on a Disneyland ride, after
all, the most successful “pirate” movie ever was Hook
more than a decade earlier, and it wasn’t even all that
successful. However, what Gladiator did for
gladiator movies, Pirates of the Caribbean: The Curse of
the Black Pearl would do for the classic pirate film.
With the creation of Jack Sparrow, Ted Elliott and Terry
Rossio along with superb acting by Johnny Depp, forged an
icon of popular culture that will undoubtedly surpass the
legendary status of real pirates such as Morgan, Avery and
Teach, and is already more popular than any other pirate in
fiction.